Total Pageviews

Showing posts with label Recipes. Show all posts

Monday, 21 April 2014

Old Mother Hubbard's Cupboard

So, what do you cook when you get home from holiday in the early hours of Sunday morning and it's Easter, which means no shops open until Tuesday?  We had a bit of a situation here, because shops and supermarkets (unlike the UK) don't open on Sunday, or Monday either if it happens to be a public holiday.  Actually, Sunday wasn't a problem because we ate out, but today some inspiration was called for.

I looked in the fridge and found some lemons, a dried chilli and a block of Parmesan.  In the (almost) empty cupboard I found some spaghetti and olive oil.  Not much in the garden just yet, but we do have herbs and young garlic.  No problem - Lemon Pasta with Fresh Baby Garlic and Oregano - we won't starve quite yet.

If you're interested in the recipe, here it is.


This amount served two of us :-

Spaghetti
Olive Oil
2-3 fresh, young garlic, sliced
Finely grated rind and juice of 1 lemon
Small red chilli (optional)
Small handful fresh oregano (or whatever you have in the garden)
Salt and black pepper
Parmesan to serve

First, put the water on to heat and add the spaghetti when it boils.  Cook for as long as it says on the packet.

Meanwhile, cook the young garlic, gently, in the oil.  I usually pull the young garlic which hasn't grown as big as the others - probably destined to produce only one or two cloves if left to mature.  At this point I crumbled a dried red chilli into the pan, but you can leave that out if preferred.

When the garlic starts to soften, add the lemon rind and chopped oregano.  Cook only until the leaves start to wilt, you don't want it crisp and brown.

Season with salt and pepper and, when the spaghetti is ready, strain and discard the liquid, and add pasta to the oil mix.  Stir in the lemon juice and cook lightly until some of the juices are soaked up by the spaghetti.

Serve topped with a sprinkling of grated Parmesan.

Lemon Pasta with Fresh Baby Garlic and Oregano


Tuesday, 20 August 2013

Witches Brew

Sorry, I've been a bit negligent of my blog readers recently - I blame the visitors!  I do have a few projects to show you once I've taken the photographs and got myself organised, but in the meantime here's a little something I threw together in my cauldron today.

This is a very easy to make ointment which is good for all sorts of things - Calendula Balm.  First grow your calendula officinalis flowers!  Then, harvest the flowers and dry them until you have a nice little amount ready to use.

Here's the recipe, and then I'll tell you what it's good for.

Calendula Balm

350ml (12 fl. oz) olive oil
56g (2 oz) beeswax
A good handful of dried calendula flowers

Dried calendula flowers


Gently warm the oil and beeswax in a double boiler and add the flowers.  Simmer for about 10 minutes or so.

Oil, beeswax and flowers in double boiler

Remove from heat and strain immediately through muslin into sterilised pots before it starts to set.
Leave to cool completely, and then put on the lids.

It's amazing how much it makes

OK, so what do you use it for?  Well, it makes a really good lip balm.  I don't know about you, but as soon as the weather starts to get cooler my lips tend to dry out and get a bit flaky.  This stuff is a perfect moisturizer for lips in the winter months.  It's also very good for rough and sore skin and also for scrapes or anything that isn't healing quite as quickly as it should.  Calendula is anti-fungal and once or twice has worked really well to stop the itching caused by athlete's foot when I was stuck without any cream.  The other thing it's been tried on was cold sores.  A friend came to visit us and forgot to bring his medication with him - sure enough, a little way into his stay he started to develop a cold sore.  In the absence of anything else, he used the calendula balm.  It didn't cure it, but it stopped it in its tracks and it didn't get any worse.

The main reason I make it though is for insect bites.  We get a lot of mosquitoes and other biting insects here and I found out quite by chance that if you treat them with the balm they stop itching very quickly.  Magic!  And just in time too - I got three bites this evening while we sat on the patio.

Thursday, 30 May 2013

Elderflower Time

I think the elderflowers are a little bit later than normal this year, but then what isn't?  This weather we're having is really quite depressing - lots of rain, rain and more rain, and we even had hailstones two days ago.  Just remind me . . . it is almost June isn't it? Anyway, managed to pick enough flowers at the weekend (and in the sun too!) to make my first batch of cordial.  I've included the recipe below in case you're tempted to make it. It's very easy!


First, pick your elderflowers - you need 35 large flower heads, picked in the sun, insects allowed to escape!

Elderflower Cordial

1 kg sugar
1.5 litres boiling water
4 med. lemons, washed
35 large elderflower heads
2 oz citric acid

Place sugar in a large saucepan and pour over boiling water.  Stir until sugar dissolves, then leave to cool.

Grate lemon rind, add to sugar water.  Slice lemons into thick slices and add to water. Add citric acid and stir, then add elderflowers and stir again.

Cover with a clean cloth and steep for 48 hours.  Strain through clean muslin into a clean bowl.  Using a funnel, fill sterilised bottles, seal and store in a cool dark place (not the fridge).

Use diluted (it's quite strong so you don't need a lot), and once opened, store in refrigerator.


Lovely with ice and sparkling water!

Sunday, 16 December 2012

Christmas Preparations

Just so you don't think I'm sitting here idle, here's a little glimpse of what I've been doing recently (but there are things I can't show you until after Santa has delivered them).

First I made the Christmas cards :-


Well, they weren't "made" as in "made from scratch", they were more recycled from cards we'd received in previous years.

Then I made the Christmas tipple.  This is Limoncello, an Italian digestif, (recipe stolen from The Italian Dish - you can find the recipe if you click on her blog at the right hand side) made from vodka and lemon zest left to soak for 7 days, and it then has a sugar syrup added.  Looking forward to trying this.


Then there were the decorations to make


and spinning, there's always spinning!  This


and this


and some of this


but I can't possibly show you any more.  That would be giving too much away!

Tuesday, 20 November 2012

(Almost) Free Food

About three weeks ago I bought a bunch of watercress for making soup.  I cut off the stems (some of which had roots growing) and pushed them into some compost in a tub in the greenhouse.  Yesterday I was able to harvest enough for another batch of soup.


The nice thing is, the plants should produce at least another batch as they're still growing quite strongly.  The soup was delicious and had far more flavour than the original watercress I'd bought, probably because there was only about 15 minutes from plant to pan.

Anyway, thought you might like the recipe; it's very easy and doesn't take long to make.

Watercress Soup

This amount serves four generous helpings.  I only did half of this as I didn't have enough watercress to do the complete recipe.

9 oz watercress, chopped
4 oz butter
Approx 14 oz leeks, chopped
4 potatoes, peeled and chopped
3 pts hot stock
4 heaped tablespoons creme fraiche
Salt and freshly ground black pepper

Melt butter in a large pan, then add chopped leeks, potatoes and watercress and stir so they are well coated in butter.  Sprinkle in some salt, then cover and sweat over a very gentle heat for about 20 minutes, giving mixture a good stir halfway through.


Add stock, bringing everything to a simmering point, and simmer, covered, for 10-15 minutes.

Remove from heat, cool slightly and blend in a food processor until smooth.  Return to pan and add 3 tablespoons of creme fraiche, season to taste with salt and pepper, then reheat gently without letting it boil.

Serve with an extra swirl of creme fraiche or cool and serve chilled in the same way.


I topped ours with a parasol mushroom (flash fried in butter until slightly crispy on the outside, but tender in the middle) that we found, and an extra sprig of watercress. Delicious!

Tuesday, 27 March 2012

Spring!

You always know when spring has arrived over here . . . that's when you can start eating your meals outdoors.

The last Monday of every month is fish and chips night!  Which just happened to be yesterday.  We have a fish and chip van visit a nearby town which is run by an English couple.  And the fish and chips are really good.  So we organised with our new neighbours that we'd go and have a little picnic.  The weather at the moment is really nice and very warm, so we packed our picnic bags with all the necessaries, knife and fork, salt and pepper, vinegar and a bottle of wine, and off we went.

We collected the goodies and then drove to a secluded little picnic table we know of. Unfortunately, there are no photos of the fish and chips - we were too hungry.  But here are the leftovers :-


and, just for a change, I got on the photos as well :-


Look at that sky!

Well, there's always a payback isn't there?  After stuffing ourselves to death last night, we decided to have a bit of moderation today.  For lunch, we had sautéed tomatoes, with young garlic out of the garden (I think! - it actually tasted just like spring onions) and herbs, topped with buffalo mozzarella and grilled until sizzling.  That was served with a side salad, all of which came from the garden.

This afternoon, I was cutting grass, during which I spotted what we'd be having for our evening meal.  And that's another sign of spring - you always know it's arrived when the nettles start to grow.  Normally at this time of year I make lots of nettle soup, but the weather has been so fantastically warm we really didn't feel like soup, so I decided to make a risotto with some fresh herbs thrown in.  If you're interested, the recipe follows. It's a very good spring tonic after the winter, especially as it contains very high amounts of iron, and lots of different vitamins, and tastes good too!  Anyway, here it is :-

NETTLE AND HERB RISOTTO

4.5 tablespoons unsalted butter
1 onion, finely diced
1 cup arborio rice
1/3 cup dry white wine
5 cups good stock (I used vegetable as I don't eat meat, but chicken would be good)
2/3 cup cooked, chopped nettles *
Handful fresh herbs (i.e. chives, rocket, marjoram - or whatever you have in the garden)
Salt and freshly ground black pepper
Half cup Parmesan, finely grated


* the nettles should be blanched in boiling salted water for one minute.  Then remove and dunk in iced water to stop the cooking process.  Squeeze out excess water and chop finely.

Bring stock to a boil, then turn down to a simmer.

Meanwhile, melt 2 tablespoons of the butter and cook chopped onions until softened but not coloured.


Add rice to pan and stir, allowing butter to coat the grains, then cook gently for a minute, then add the wine.  Stir until liquid has almost disappeared.  Add a ladleful of the stock, stirring.  Add more stock as it is absorbed.


When rice is cooked, and stock almost all absorbed, add nettles and herbs and stir to heat through.  Turn heat down and allow risotto to rest for about a minute.

With a wooden spoon, beat in the remaining butter and the Parmesan, stirring well. Season to taste with salt and pepper.

ENJOY!


Tuesday, 28 February 2012

Rowena's Houmous

This is a recipe given to me by my friend Rowena, and I think it's the best houmous I've ever tasted.  I made some last week when we had friends round, and I've made another lot since.  The recipe has been passed far and wide since Rowena gave it to me.


2 cups cooked chickpeas (reserve a little of the fluid in case it's needed)
1/3 cup Tahini
1/4 cup lemon juice
1 tsp salt
+/- 2 cloves garlic
1 tbsp olive oil
Paprika and parsley to garnish

Blend the first five ingredients until smooth.  If the mix is too thick, thin it down with a little of the chickpea fluid from the tin.  Spread into a flat-bottomed dish, garnish with paprika and parsley, then drizzle with olive oil.

Easy peasy!  And much better than the houmous you buy in the supermarket.

Thursday, 5 January 2012

Inspiration

Inspiration can come from many different places and people.  This week I was inspired by two of the websites I follow: firstly, the Italian Dish blog which you can find on my side bar (just click on the web address and it will take you to her site), and secondly from a fairly new dyeing and spinning blog that I've been looking at.

I'm tempted by lots of different recipes on the Italian Dish, and this week decided to make some of these :-

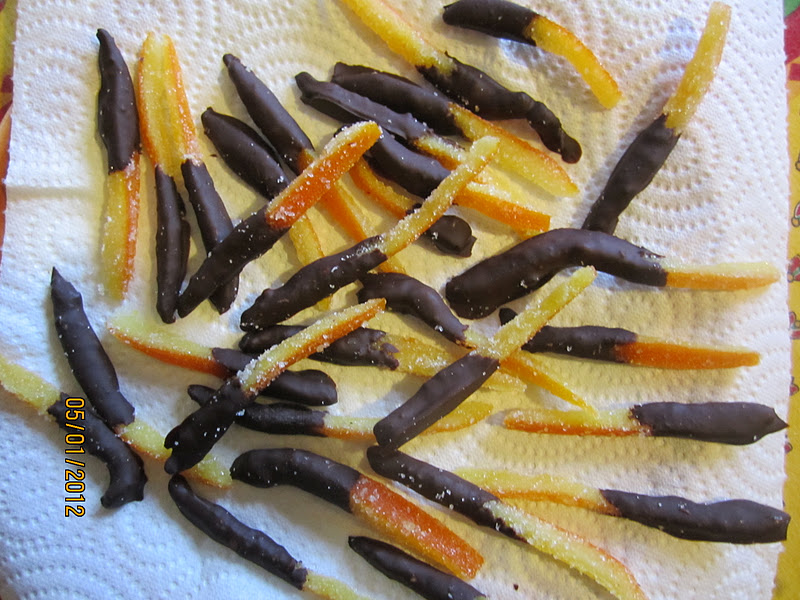
Orangettes
I'd never made any candied peel before and was really surprised at how easy these were to make.  The orange peel (including pith) is just cut into slices, blanched for 2 minutes in boiling water (3 times), and then cooked in a mixture of orange juice, sugar and water. After that they're rolled in sugar (I used caster sugar) and laid out to dry.  Next day they're simply dipped into melted chocolate and put onto greaseproof paper to solidify. They are delicious!  I'll definitely be making them again, especially as I made three baking sheets-worth and we've only got these left :-


Mind you, I did separate out a tubful for a gift.  On second thoughts, maybe it's not such a good idea to make them too often!!

The second bit of inspiration I had was really more of a reminder than anything.  I was looking at this site and when I saw that she was dyeing with lichen, I remembered I had two bags in my cupboard.  So today, out came the dye pots, in went the lichen, and hopefully out comes some really pretty wool.


I had two different types of lichen (they do look a bit the same, but one was green and one brown) so I kept them separate, but actually they looked pretty similar once I'd strained them and put in the wool.


The two pans are now cooling and I'll leave the wool in there until they're completely cold. Only when it's been rinsed will I know if there is any difference between the two.

I forgot to post the result of my dyeing experiment with the apricot bark.  It was a bit disappointing because, although there seemed to be plenty of colour in the dye, the wool just didn't seem to take up much of it.  The photos below don't do it justice really as it's a very pale peach with the tips a bit darker.


I put the pieces of bark back into some water to see if I could extract any more dye, so maybe I should just put this back in and have another go.  It's got the potential to be quite a pretty colour if only I could get some more dye into it.

I'll post the results of the lichen dyes in a day or two - I'm actually quite excited about these.


Friday, 30 December 2011

Friday's Feast!

Recently, I've been looking at this website (you can also visit by clicking on The Italian Dish in my blog list on the sidebar.  It's a really special website if you're interested in Italian cooking, or any cooking for that matter.

Anyway, it reminded me just how easy it is to make your own fresh pasta.  It's quite a long time since I made any, I don't know why, but she inspired me to make some for our lunch today.

Her recipe is very simple, just one egg to three quarters of a cup of flour, but because I used a bit more flour (one full cup), I added a bit of olive oil as well.


You just mix the flour into the egg with a fork until it comes together, then knead it into a ball which is placed in the fridge for 20 minutes or so (a good time to make the sauce!)


Then you just cut it into sections and put each one through the rollers of a pasta maker (mine's an Imperia bought for me by a friend - he bought me a motor for it too, so it's very easy to make by myself, two hands instead of three)


until it's thin enough to feed into one of the two cutters.  I used the spaghetti sized one today, except that it's square-sectioned rather than round.  I'm sure the Italians have a name for this pasta but, not knowing what it is, I'll just call it spaghetti.


Finished!


If you don't have a pasta maker, it is possible to make it using a rolling pin, but it's difficult (though not impossible) to get it really thin as the dough is quite elastic and springs back.  It can then be cut with a knife.

At this point, the water was boiling, and it just takes two minutes to cook - brilliant.

I would have posted a photo of the dish on the table, but my camera ran out of battery at that point - next time maybe.

Sunday, 9 October 2011

Pumpkins

My pumpkins failed to put in an appearance this year and they are sadly missed.  We keep passing gardens which have lots of them laid out on the vegetable beds, just to taunt me.

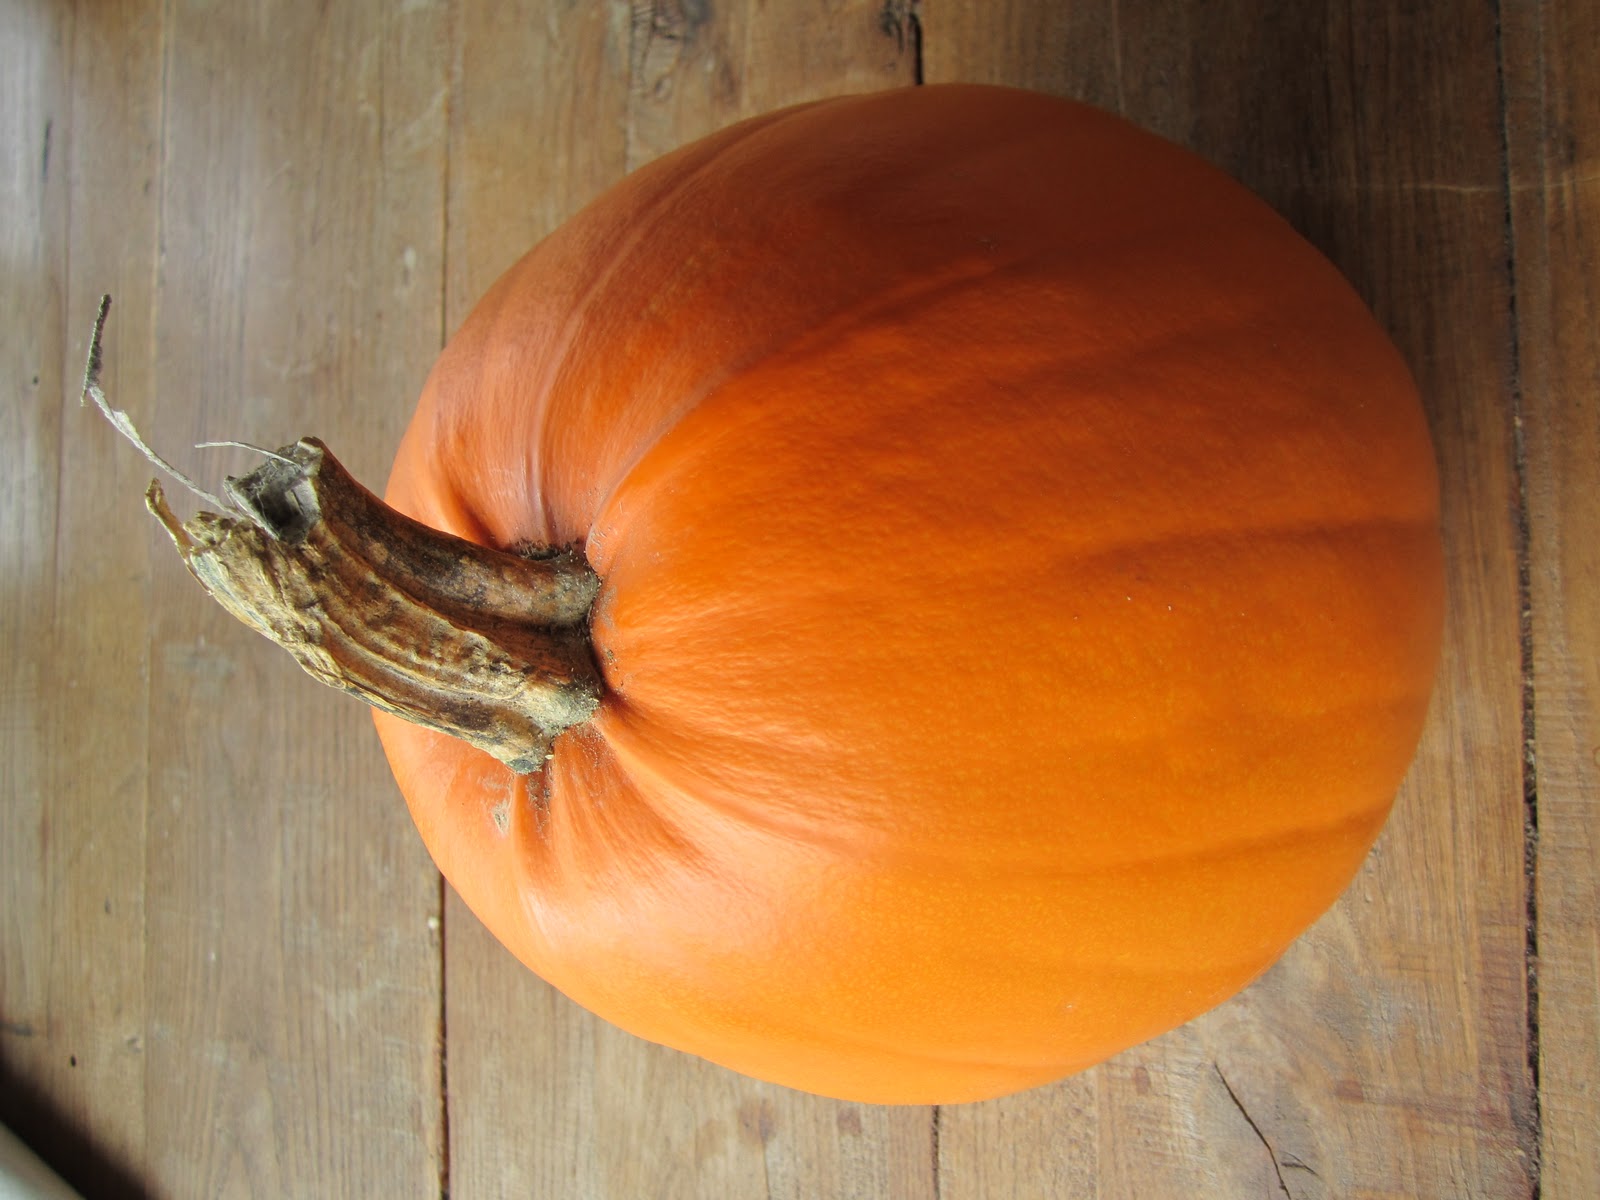
The other day, we visited an organic farm to buy some lamb for one of our visitors, and Louisa gave me a large pumpkin to take home (plus a couple of butternut squash).  Here it is in all it's glory :-


Sorry about the "turn right" printed on the photo - we've had horrendous problems trying to turn the photo around because I took the photo sideways. This was the best we could do - at least the pumpkin is not on it's side any more.

Anyway, it looked just too perfect to cut into . . . but, it had to be done!

A few years ago we went to a restaurant in Scotland and had pumpkin and chilli soup, and it was so, so good I decided to try and make it myself.  This is my version, hope you enjoy it :-

Chris' Pumpkin and Chilli Soup

Olive Oil
2 medium onions, chopped
2 garlic cloves, chopped
1-2 red chillies, sliced
Medium-sized pumpkin, chopped
1.5 pts vegetable stock
Small tub half-fat creme fraiche
Salt and black pepper

Saute onions, garlic and chillies in oil for a few minutes, then add pumpkin. Give everything a good stir, put lid on pan and sweat over a low heat for 5 minutes.  Stir in stock and simmer gently until all vegetables are tender.

Liquidise soup in food processor, or press through a sieve.  Pour back into pan, stir in creme fraiche and season to taste.

Re-heat, without boiling, and serve immediately with a few croutons* sprinkled on top.

*A nice alternative to croutons is to slowly roast the pumpkin seeds in oil with salt and pepper until they are tender and then sprinkle some of these on top of the soup.  The rest make a delicious snack when you're feeling a bit peckish!

Monday, 26 September 2011

Courgette Recipe

If you've had as many courgettes this year as we have, you'll be constantly looking for new recipes.  Unfortunately, I can't claim this one as mine as it came from the BBC Good Food site, but I can claim it as one of my favourites.

Courgette and Parmesan Tart


Ready-rolled puff pastry (I prefer to make my own shortcrust)
3 courgettes, sliced
2 garlic cloves (or more if you like), sliced
Olive oil
4 tbsp mascarpone*
50g grated Parmesan
Salt and black pepper

*I find the mascarpone and parmesan mix a little too thick, so I add some creme fraiche to thin it down a little)

Heat oven to 200 deg.C
Line dish or tray with pastry.
Toss courgettes and garlic with olive oil and lots of seasoning.
Mix mascarpone with half the parmesan and spread in pastry case.  Arrange courgettes in overlapping rows.
Bake 15 mins.
Scatter with remaining parmesan.
Bake 15-20 minutes.

This is a very easy recipe to prepare, and I've dished it up for lots of people. So far, everyone thinks it's fabulous - definitely one to try.

P.S.  The cotton flowers have now fallen off and there's a little bulbil underneath, so I think they were pollinated.

Friday, 22 July 2011

Courgette Glut?

If, like us, you have courgettes piling up against the front door, try this recipe. It's really easy, and very tasty.  I actually got it from bbcgoodfood.com.  As usual (for me), I "doctored" it a bit, and it was very tasty.  The amounts here will serve 4 people.

Courgette Fritters with Tomato and Feta Salsa

1 red chilli, finely chopped
125g self-raising flour
Half a red onion
2 large eggs
3 medium courgettes, grated
4 tbsp olive oil
1 tsp cumin seeds (didn't have any, so used fenugreek seeds)
Salsa ingredients :-
125g cherry tomatoes, quartered and mixed with
100g crumbled Feta and a
Handful of mint leaves, chopped and
Juice of half a lemon

Mix chilli, courgette, onion, cumin seeds, flour and eggs together (I also added some green coriander seeds for a bit of "zing") and season with salt and black pepper.
Heat 1 tbsp oil in a non-stick frying pan, drop in heaped tablespoons of batter.  Cook, in batches, for 2-3 minutes each side, or until golden.
Meanwhile, mix all the salsa ingredients and serve with the fritters.

We had it with garlic mashed potato and a nice, cold glass of white wine.  I'll definitely be making it again.

Wednesday, 25 May 2011

Another Recipe

This one's for Pam and Andrew, friends in the UK.  Another pasta recipe I'm afraid.  This is not one of mine, we call it Jane's Chilli Pasta because the recipe was given to me by my sister in law in Switzerland - think it's originally a Delia Smith though (although she uses parsley where I use coriander).

The nice thing about this is that you can make a batch of it and keep it in a jar in the fridge until you need it, and it should do 2 or 3 meals.

JANE'S CHILLI PASTA

1 red or green chilli, chopped
Coriander, chopped
Extra-virgin olive oil
Capers and black olives - chopped
Zest and juice of half a lemon
Clove garlic, crushed
Salt and black Pepper
Spaghetti
Fresh Parmesan


Cook spaghetti, grate Parmesan.
Meanwhile, mix all remaining ingredients in a jar, shaking well.
Serve cold (I just put the jar on the dining table) stirred through pasta and topped with Parmesan.


Sorry there are no quantities, it really is a question of taste.  I probably use about a tablespoon of capers and maybe 2 of olives, a handful of coriander and then, when all other ingredients are in the jar, I approximately double the amount with olive oil.  You only need about 2 dessertspoons for each person as it's quite a strong flavour.

New Pasta Recipe

Developed yet another new pasta recipe today.  Whenever I ask Eric what he would like for lunch/dinner, I can almost guarantee he'll say "pasta".  Since I get a bit fed up with his usual favourites of pesto or tomato, I occasionally dream up something a bit different.  Sometimes it works, sometimes it doesn't.

Today, I really wanted something tasty and fresh, not cheesy or stodgy.  I consulted my pasta bible, but all the recipes I might have made needed at least 2 ingredients that I didn't have.  So, I visited the fridge and found asparagus and fresh rocket, then visited the food cupboard and took out a small jar of tomato puree (bottled last year from our own tomatoes), then visited the herb garden and came back with a handful of fresh, green, flavourful leaves.  This is what emerged:-

 SPAGHETTI WITH HERBS AND ASPARAGUS


Ingredients :


Spaghetti
Olive Oil
Whole garlic cloves (halved if large) - I used a whole bulb as we have so much
Handful of fresh chopped herbs (i.e. thyme, marjoram, sage, rosemary)
Fresh aparagus tips (about 6 per person)
Small jar tomato puree
Salt and black pepper
Fresh rocket, roughly chopped
Fresh Parmesan, finely grated


Method :


Saute garlic in oil over a medium heat.  Meanwhile, cook asparagus in pasta water for about 8-10 mins, then remove with a slotted spoon.  Bring water back to the boil and add spaghetti.  Cook for recommended time.

When garlic is soft and just taking on a bit of colour, add herbs and asparagus and stir well over a low heat.  Pour in tomato puree and heat through.  Season with salt and black pepper.

When pasta is ready, stir rocket into the sauce.  Serve on top of the spaghetti and sprinkle with freshly grated Parmesan.


The flavours were actually very complimentary - think this is one of my more successful recipes.  Sorry no photos . . . we ate it!