Total Pageviews

Saturday, 7 July 2018

Tour de Fleece is Here Again!

Another year has flown by and brought me to one of my favourite events of the year - Tour de Fleece 2018.  We've got lots of challenges planned again in Team DIY and Dye, and I've chosen to start with a tweed yarn using some merino I dyed in the spring with woad from the garden.


The preparation for tweed yarn can be quite time-consuming.  I tried putting the unprepared fleece through the drum carder, but it came out a bit rough and "neppy" (lots of little balls of fluff mixed in with the nice straight fibres), so I hand-carded the lot into rolags first.  Then I put the rolags through the drum carder which meant an extra step, but it was much smoother that way.

The blue was carded three times, then I added lots of colours (naturally-dyed leftovers from 5 (I think) years ago.


The whole lot was then carded another 3 times to integrate the colours with the blue.


I think this was the second pass through the drum carder, but it's looking pretty good.

After the final pass, the resulting batts didn't look too promising and I began to think I'd mixed it too much,


but once I started spinning the colours just started to pop out.  This is as far as I got today, but I have carded more for tomorrow and will hopefully finish this bobbin then.


Jacey Boggs from PLY Magazine is running a series of challenges this year - one a week - the prize for some lucky spinner is a year's subscription to PLY Magazine.  Very nice and very worth having!  This week's challenge is tweed yarn, so I'll be submitting my final photo for a chance to win (not that that matters, because the whole idea is to challenge yourself to spin something you might not otherwise try).

Roll on tomorrow!!

Friday, 22 June 2018

Wee Dye Test Update

A month ago, I showed you the results I achieved dyeing a little knitted sample of handspun Cotswold with the leftover water after cooking globe artichokes.  I was really pleased with the grey it gave.  I realised however, that I had no clue whether it would fade away to nothing within a few days or weeks.  Well, since then, it's been sitting on a table in the window with half of it covered up to keep part of it in the dark.


After a month of, not exactly sunshine, but light it doesn't seem to have changed at all. The top half of this sample was kept in the dark and, although it looks a little different on this photo, the bottom half in real life hasn't altered at all from the top half.

I'm going to put it back in the window for another month because, as I hinted, we haven't had a great deal of strong sunshine in the last month.  We now seem to have hit a really hot spell with wall-to-wall sunshine, so I think the true test will be still to come.

2018 Flax Project 2

All my good intentions of updating this little project regularly, i.e. at least once a month, seem to have fallen by the wayside.  However, today I found the plants were covered in little blue flowers.


It's now 2 months since they germinated and they're just over two and a half feet high.  I think another month and they'll be ready to harvest.

It was a bit breezy this morning, so difficult to get clear pictures, but these might give you some idea of what the flowers look like.


Next stage : seed.

Apparently, the seeds will not be fully matured when the time comes to harvest, so I'm planning on leaving some of the plants in the ground so the seeds can ripen.  That way I'll have seed for planting next year.

I need to find a good, safe place to keep my seed this time around.  It's a number of years since I last tried saving seed from flax and I put them on a shelf in my craft cupboard, only to find a mouse had got in and eaten the lot!  We learn from our mistakes eh?

Friday, 25 May 2018

Wee Dye Test

That's "wee" as in little, not "wee" as in . . . well, you know what I mean!

The other day I cooked some globe artichokes from the garden for our lunch and was amazed at the colour of the water after I removed them.  Normally I just drain the pan and then take out the artichokes, but this time I took them out and left the water in the pan.  I really couldn't capture the colour with my camera, but it was a vivid, translucent, deep green, almost iridescent.

Not having any yarn pre-mordanted, I poured some of the liquid into a large jam jar, sprinkled in about a teaspoon of alum, mixed well, and then added a little knitted sample of my latest Pickwick Cotswold fleece.  Over the next couple of days it was heated occasionally (when I remembered!)  in the microwave and the sample came out a really pretty pale grey.  I still had another jam jar full of liquid, so I repeated the test (no extra mordant added as I thought the sample would be nicely mordanted by now) with the new liquid.  Here's what came out :-


I've been looking for something natural to give a grey dye for a while, so this looks like it might just do.  I think I'd need quite a number of artichokes to do any significant amount though.  I wonder if the leaves would give the same colour?  I have lots of leaves, so maybe that'll be my next dye project.

In the meantime, I have no idea how light-fast this is going to be, so I think I need to expose part of this to the sunlight and see what happens.


Thursday, 10 May 2018

2018 Flax Project

Thought you might like to join me on my new flax project this year.  I've grown flax before, and it grew well, but my attempts at turning it into yarn weren't too successful (in fact, I failed miserably)!  This year is going to be different.  This year I plan on trying different techniques to harvest the fibres from the stems and hopefully succeed in producing some useable fibres to spin into linen yarn.  I hope to try retting some of them in water, grass retting (although at the time the plants are ready to harvest, our grass is usually non-existent because of drought) and I also may try harvesting the fibres from fresh plants.  I've tried it recently with nettles and it seems to work OK, so why not with flax?

The seeds went in on April 20th, and took less than a week to germinate.  I'd pre-prepared the soil by digging in some well-rotted compost from my heap in the garden and then sprinkled the seeds in rows in a block of about 1.5 x 1 metre.  I kept the cat out of the patch by positioning glass cloches on end all over the site.  The birds didn't seem interested, so I have a good crop of seedlings.  Three weeks after sowing the seed, this is what they look like :-


You can see the cloches at the outside of the patch - I'd removed the ones from the middle to take the photo.

Plus a little close-up of the plantlets :-


I think I read somewhere that it's best to grow them in a block, rather than a long row - they do seem to hold each other up anyway!

So, I'll keep you posted on how they're growing and hope you'll stay with me until I get to the end - the spinning of the fibres!


Saturday, 14 April 2018

Flowering Woad Blue

You may remember, four years ago, I blogged about my dyeing attempts with second year woad here.  At the time, the plants had not started putting up flowering spikes (except for one plant) so I was reasonably sure I would get some blue from the leaves.  Well this year, by the time I got around to dyeing again, ALL the plants had put up flowering spikes albeit they were only about 3 inches high, and the flowers hadn't opened.

All the dye books I have say it's not possible to get blue from 2nd year leaves, but I just wonder how far into the 2nd year you can go before the plant gives up the ghost.

Not one to waste resources, or opportunities to prove myself wrong (you really can't get blue from flowering woad plants, can you?) I harvested about 4 or 5 plants - i.e. pulled them up! - and took off all the original base leaves, leaving the flower spikes for the compost heap.  I must admit I wasn't very optimistic at this stage.

I had about 700g of leaves, so I was fairly certain it would cope with 80g of merino :-


and 65g of mohair :-


As you can see, the merino took the colour really well.  Maybe a bit too well really because the mohair didn't get as much blue at all.  It's possible that merino takes up the dye more quickly than mohair, so by the time the mohair was ready for a bit of blue, there wasn't much left.  This will be going back into my next woad dye pot, but next time it'll go in alone.

In the meantime, this is what my woad plants look like now :-


It's a little bit difficult to see, but the flower stalks are quite tall and will probably burst into flower very soon.  So, what do you think?  Would I still get blue if I used these plants?  I won't be able to try until next week now, but maybe I'll have a go - nothing ventured, nothing gained.  And I've never been one to accept "you can't do that!"  So, is it possible to dye from 2nd year, fully flowering woad plants?  Watch this space!

Wednesday, 4 April 2018

Eeeeeek!!! A Steek!

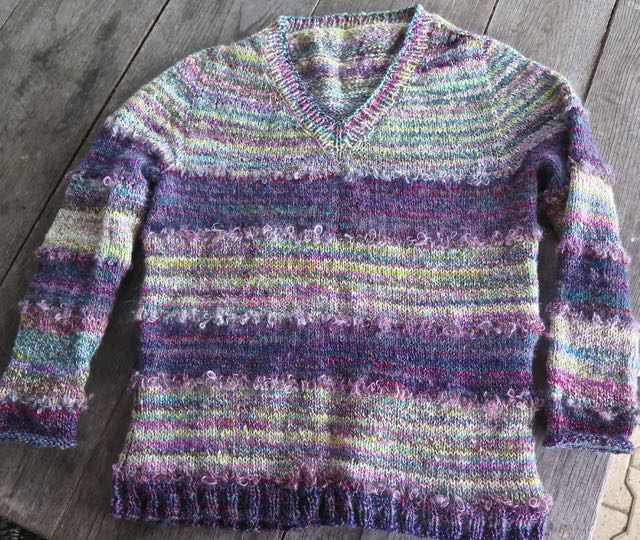
A number of weeks ago, I found an abandoned project bag in my cupboard which contained the body of a v-neck sweater, but no sleeves.  I honestly don't remember when I started this, but I thought it was time to finish it.  I had no clue which pattern I was following at the time, so a bit of research was needed.  Turns out it was the Simple Summer Tweed Top Down V-Neck by Heidi Kirrmaier.

I'd chosen three yarns that really went together quite well.  The first was a World of Wool Botany Lap Waste mix which I spun in March 2015, and if I'd had enough, I would just have used this, but there wasn't quite enough so I found another to complement it.

Botany Lap Waste Mix

The second was spun in January 2016.  This was made up of 1 ply pure Cashmere (from Hilltop Cloud in the UK), and 1 ply "Extasy" by Faerie Fibre here in France (Merino, Tussah Silk, Bamboo and Stellina).

Faerie Cashmere

Last but not least, I chose this boucle which was spun during the Tour de Fleece in July 2015.  This is my first (and so far only) attempt at boucle.  It's made up of mohair, alpaca and tussah silk.


TDF Boucle

It didn't take long to knit up the sleeves, but then I decided to put a rib on the bottom and round the neck.  You can maybe see the boucle in between the bands of colour, I just knit one row to separate them as I knew I didn't have much of it.


Finished Sweater

When I'd finished, and tried this on, I really wasn't happy with it.  It just didn't do me any favours at all - the colours were fine, it was maybe just the shape (or, more to the point, mine!!)

I plucked up all my courage, and did something I swore I'd never try (scaredy cat!) . . . a steek . . . eeeeek!!!!

On to the internet I went and looked up "how to do a steek".  There were a few different methods but I liked the crochet one best.  This is where you find the centre stitch and crochet the right side of it with the left side of the next stitch, all the way down the sweater. Then you start at the bottom and crochet together the left side of the centre stitch and the right side of the next stitch, all the way back up to the top.  You then have two lines of crochet which lean outwards away from each other.  There will be a "ladder" of yarn in between them, and this is where it has to be cut.

I have to confess that I didn't really have enough confidence in my crochet, mainly because of the boucle rows - I couldn't see exactly what I was doing when I picked up the loops from the two stitches and realised if I hadn't got it right, I was going to be in trouble. So I cheated!  I ran a sewing machined stitch down each outside edge of the crochet so that if the boucle failed, it would be held by the machine stitching.

Steek in Progress!

I didn't get a photo of the cutting part!  I was so nervous, I just wanted to get it done in one, and once it was cut, I just wanted to get the stitches picked up so I could finish the thing off!  Anyway, it actually worked pretty well and I had no disasters, thank goodness.


The finished cardigan (unblocked as yet - apparently we're getting a few days of rain, so I'll do it when that's passed over) adorned with 2nd use buttons from my late mother-in-law's button tin, which I inherited.  She was the type who, if she bought something she really liked, she'd buy some more in different colours.  I have to say, I'm glad she did, because I really like the mix of different colours and I think they go perfectly with the cardigan.