A number of weeks ago, I found an abandoned project bag in my cupboard which contained the body of a v-neck sweater, but no sleeves. I honestly don't remember when I started this, but I thought it was time to finish it. I had no clue which pattern I was following at the time, so a bit of research was needed. Turns out it was the Simple Summer Tweed Top Down V-Neck by Heidi Kirrmaier.
I'd chosen three yarns that really went together quite well. The first was a World of Wool Botany Lap Waste mix which I spun in March 2015, and if I'd had enough, I would just have used this, but there wasn't quite enough so I found another to complement it.
The second was spun in January 2016. This was made up of 1 ply pure Cashmere (from Hilltop Cloud in the UK), and 1 ply "Extasy" by Faerie Fibre here in France (Merino, Tussah Silk, Bamboo and Stellina).
Last but not least, I chose this boucle which was spun during the Tour de Fleece in July 2015. This is my first (and so far only) attempt at boucle. It's made up of mohair, alpaca and tussah silk.
It didn't take long to knit up the sleeves, but then I decided to put a rib on the bottom and round the neck. You can maybe see the boucle in between the bands of colour, I just knit one row to separate them as I knew I didn't have much of it.
When I'd finished, and tried this on, I really wasn't happy with it. It just didn't do me any favours at all - the colours were fine, it was maybe just the shape (or, more to the point, mine!!)
I plucked up all my courage, and did something I swore I'd never try (scaredy cat!) . . . a steek . . . eeeeek!!!!
On to the internet I went and looked up "how to do a steek". There were a few different methods but I liked the crochet one best. This is where you find the centre stitch and crochet the right side of it with the left side of the next stitch, all the way down the sweater. Then you start at the bottom and crochet together the left side of the centre stitch and the right side of the next stitch, all the way back up to the top. You then have two lines of crochet which lean outwards away from each other. There will be a "ladder" of yarn in between them, and this is where it has to be cut.
I have to confess that I didn't really have enough confidence in my crochet, mainly because of the boucle rows - I couldn't see exactly what I was doing when I picked up the loops from the two stitches and realised if I hadn't got it right, I was going to be in trouble. So I cheated! I ran a sewing machined stitch down each outside edge of the crochet so that if the boucle failed, it would be held by the machine stitching.
I didn't get a photo of the cutting part! I was so nervous, I just wanted to get it done in one, and once it was cut, I just wanted to get the stitches picked up so I could finish the thing off! Anyway, it actually worked pretty well and I had no disasters, thank goodness.

The finished cardigan (unblocked as yet - apparently we're getting a few days of rain, so I'll do it when that's passed over) adorned with 2nd use buttons from my late mother-in-law's button tin, which I inherited. She was the type who, if she bought something she really liked, she'd buy some more in different colours. I have to say, I'm glad she did, because I really like the mix of different colours and I think they go perfectly with the cardigan.
I'd chosen three yarns that really went together quite well. The first was a World of Wool Botany Lap Waste mix which I spun in March 2015, and if I'd had enough, I would just have used this, but there wasn't quite enough so I found another to complement it.
 |
| Botany Lap Waste Mix |
The second was spun in January 2016. This was made up of 1 ply pure Cashmere (from Hilltop Cloud in the UK), and 1 ply "Extasy" by Faerie Fibre here in France (Merino, Tussah Silk, Bamboo and Stellina).
 |
| Faerie Cashmere |
Last but not least, I chose this boucle which was spun during the Tour de Fleece in July 2015. This is my first (and so far only) attempt at boucle. It's made up of mohair, alpaca and tussah silk.
 |
| TDF Boucle |
It didn't take long to knit up the sleeves, but then I decided to put a rib on the bottom and round the neck. You can maybe see the boucle in between the bands of colour, I just knit one row to separate them as I knew I didn't have much of it.
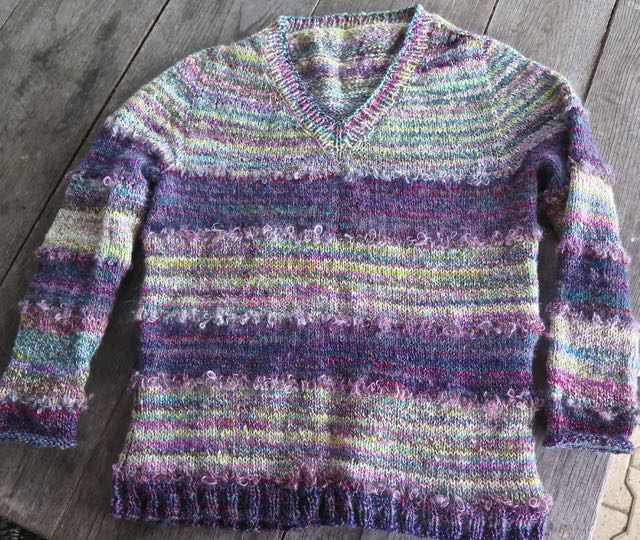 |
| Finished Sweater |
When I'd finished, and tried this on, I really wasn't happy with it. It just didn't do me any favours at all - the colours were fine, it was maybe just the shape (or, more to the point, mine!!)
I plucked up all my courage, and did something I swore I'd never try (scaredy cat!) . . . a steek . . . eeeeek!!!!
On to the internet I went and looked up "how to do a steek". There were a few different methods but I liked the crochet one best. This is where you find the centre stitch and crochet the right side of it with the left side of the next stitch, all the way down the sweater. Then you start at the bottom and crochet together the left side of the centre stitch and the right side of the next stitch, all the way back up to the top. You then have two lines of crochet which lean outwards away from each other. There will be a "ladder" of yarn in between them, and this is where it has to be cut.
I have to confess that I didn't really have enough confidence in my crochet, mainly because of the boucle rows - I couldn't see exactly what I was doing when I picked up the loops from the two stitches and realised if I hadn't got it right, I was going to be in trouble. So I cheated! I ran a sewing machined stitch down each outside edge of the crochet so that if the boucle failed, it would be held by the machine stitching.
 |
| Steek in Progress! |
I didn't get a photo of the cutting part! I was so nervous, I just wanted to get it done in one, and once it was cut, I just wanted to get the stitches picked up so I could finish the thing off! Anyway, it actually worked pretty well and I had no disasters, thank goodness.

The finished cardigan (unblocked as yet - apparently we're getting a few days of rain, so I'll do it when that's passed over) adorned with 2nd use buttons from my late mother-in-law's button tin, which I inherited. She was the type who, if she bought something she really liked, she'd buy some more in different colours. I have to say, I'm glad she did, because I really like the mix of different colours and I think they go perfectly with the cardigan.
No comments:
Post a Comment